
Cheesy Garlic Bliss Pull-Apart Rolls: A Delicious Twist on a Classic Favorite
Pull-apart rolls have become a beloved staple at gatherings, family dinners, and potluck events. Their warm, fluffy texture and the joy of tearing them apart make them an instant hit, whether served alongside soups and salads or enjoyed on their own. The versatility and comforting nature of these rolls have inspired countless variations, but few can rival the indulgent appeal of Cheesy Garlic Bliss Pull-Apart Rolls. This recipe not only enhances the traditional roll with the rich flavors of garlic and cheese but also elevates it to a dish that is sure to impress your guests.
Imagine the aroma of freshly baked rolls wafting through your kitchen, their golden-brown exteriors hinting at the cheesy, garlicky goodness contained within. The Cheesy Garlic Bliss Pull-Apart Rolls are perfect for any occasion, be it a cozy family dinner, a festive holiday gathering, or simply as a comforting snack to enjoy with friends. With each pull, you’ll experience the delightful combination of savory garlic and melted cheese, making these rolls a true crowd-pleaser.
Understanding the Ingredients
To create the perfect Cheesy Garlic Bliss Pull-Apart Rolls, it’s essential to understand the role of each ingredient. At the heart of this recipe are three primary components: all-purpose flour, yeast, and butter.
All-Purpose Flour: This versatile flour serves as the foundation for the rolls. It provides the structure and texture needed for the dough to rise and hold its shape. For the best results, opt for unbleached all-purpose flour, which has a slightly higher protein content than bleached varieties, yielding a chewier texture.
Yeast: Yeast is the magic ingredient that causes the dough to rise, creating those airy pockets that make pull-apart rolls so desirable. Using fresh yeast is crucial; stale or expired yeast can lead to disappointing results. Look for active dry yeast or instant yeast, both of which are easily accessible and reliable for home baking.
Butter: Butter adds richness and flavor to the dough. It contributes to the soft texture of the rolls and enhances the overall taste profile. For a more intense flavor, consider using unsalted butter, which allows you to control the saltiness of the final product.
In addition to these key ingredients, garlic and cheese play pivotal roles in defining the flavor of the rolls. Fresh garlic provides a robust, aromatic quality, while cheese adds creaminess and a savory depth. Parmesan, mozzarella, or even a sharp cheddar can be used to create a deliciously gooey interior.
When selecting your ingredients, freshness is key. Fresh garlic will impart a stronger flavor than pre-minced alternatives, and high-quality cheese will melt beautifully, ensuring that each bite is a delightful experience. If you’re looking to experiment, feel free to substitute different cheeses or add herbs like rosemary or thyme to the mix for a unique twist.
The Science Behind Yeast Activation
Understanding the activation of yeast is essential for successful bread-making. Yeast is a living organism that ferments sugars in the dough, producing carbon dioxide gas and causing the dough to rise. The process of activating yeast is relatively straightforward but requires attention to detail.
To activate yeast, it typically needs to be mixed with warm water (between 100°F to 110°F) and a small amount of sugar. This warm temperature encourages the yeast to wake up and begin its fermentation process. You will know your yeast is activated when it becomes frothy and bubbly, indicating that the yeast is alive and ready to work its magic in your dough.
One common mistake when working with yeast is using water that is too hot, which can kill the yeast, or too cold, which won’t activate it effectively. Always measure your water temperature with a thermometer for accuracy, especially if you’re new to baking.
Step-by-Step Preparation Process
Now that we’ve covered the essential ingredients and the science behind yeast activation, it’s time to dive into the preparation process for your Cheesy Garlic Bliss Pull-Apart Rolls. Follow these detailed steps to ensure that your rolls turn out perfectly every time.
1. Activating the Yeast: Start by combining active dry yeast with warm water and a teaspoon of sugar in a small bowl. Let it sit for about 5 to 10 minutes until it becomes frothy. This is a sign that your yeast is active and ready to use.
2. Combining Dry Ingredients: In a large mixing bowl, whisk together the all-purpose flour and salt. Make a well in the center and pour in the activated yeast mixture along with melted butter. Use a wooden spoon or spatula to combine the ingredients until they come together into a shaggy dough.
3. Kneading the Dough: Transfer the dough onto a lightly floured surface and begin kneading. To knead, fold the dough over itself and push it away with the heel of your hand. Rotate the dough a quarter turn and repeat this process. Knead for about 8 to 10 minutes until the dough is smooth and elastic. The goal is to develop the gluten in the flour, which gives the rolls their structure.
The Aromatic Garlic Butter Mixture
While your dough is rising, it’s time to prepare the aromatic garlic butter mixture that will enhance the flavor of your Cheesy Garlic Bliss Pull-Apart Rolls. Begin by melting butter in a small saucepan over low heat. Once melted, add minced garlic and sauté until fragrant, being careful not to let it brown. This step infuses the butter with the rich flavor of garlic.
To balance the flavors, stir in grated Parmesan cheese, chopped fresh parsley, and a sprinkle of Italian seasoning into the garlic butter. The cheese adds a salty, umami richness, while the parsley brings a pop of freshness. You can also experiment with different herbs or spices, such as oregano or red pepper flakes, to customize the flavor to your liking.
As you prepare this mixture, the anticipation builds—soon, you will be enveloping your dough in this heavenly blend of garlic and cheese, resulting in rolls that are not only delicious but also aromatic and inviting.
Stay tuned for the next part of the recipe, where we will assemble the rolls, let them rise, and ultimately bake them to golden perfection.
Shaping and Assembling the Rolls
Once your dough has risen beautifully and doubled in size, it’s time to shape and assemble your Cheesy Garlic Bliss Pull-Apart Rolls. The technique you use here can make a significant difference in the final product, so let’s dive into the best practices.
Techniques for Dividing and Shaping Dough
To create uniform pieces that will bake evenly, lightly flour your work surface and your hands to prevent sticking. Turn out the dough onto the floured surface and gently punch it down to release any trapped air. Divide the dough into equal portions, usually about 12-15 pieces, depending on the size you desire for your rolls.
To shape the dough, take each piece and pull the edges towards the center, pinching them together to form a smooth ball. This technique helps create surface tension, leading to taller, fluffier rolls. Once shaped, place the dough balls on a baking sheet lined with parchment paper, ensuring they are close but not touching.
Importance of Even Coating with Garlic Butter
A critical step in achieving that irresistible flavor is ensuring each roll is evenly coated with garlic butter. After shaping, melt your garlic butter mixture (consisting of butter, minced garlic, and fresh parsley) and use a pastry brush to apply it generously over the tops of the dough balls. This not only infuses the rolls with flavor but also helps them achieve a beautiful golden-brown color when baked. Be sure to cover all surfaces for maximum flavor distribution.
Tips for Arranging Dough Balls in the Pan
For the best pull-apart effect, arrange the dough balls in a greased round or square baking pan, depending on your preference. Position the rolls closely together so they touch slightly. This ensures they rise up instead of spreading out, creating that delightful pull-apart texture we all love. If you’re feeling creative, you can even arrange them in a spiral pattern or in the shape of a flower, which will impress your guests and elevate your presentation.
The Second Rise: Importance and Techniques
After shaping and assembling your rolls, they will need a second rise, which is crucial for achieving that light, fluffy texture that makes these rolls irresistible.
Explanation of the Second Rise
The second rise allows the gluten in the dough to relax and develop further, creating a softer texture. This process also gives the yeast another opportunity to produce gas, which helps the rolls rise higher. Skipping this step can result in dense, heavy rolls, so it’s best not to rush it.
Optimal Conditions for Dough Rising
For the dough to rise effectively, it requires a warm, draft-free environment. An ideal temperature for rising is between 75°F to 85°F (24°C to 29°C). You can create a suitable environment by preheating your oven to the lowest setting for a couple of minutes, then turning it off and placing the covered dough inside. Alternatively, a warm kitchen countertop or a sunny spot works well too.
Visual Cues to Look for During the Rising Process
During the second rise, allow the rolls to rest until they have puffed up significantly, usually about 30 to 45 minutes. A good visual cue is to look for the dough to have nearly doubled in size, with the rolls touching each other. Gently poke a roll with your finger; if the indentation bounces back slowly, they are ready to bake.
Baking the Rolls to Perfection
Now that your rolls have risen beautifully, it’s time to bake them to perfection.
Temperature Settings and Baking Times
Preheat your oven to 350°F (175°C). This moderate temperature allows the rolls to bake evenly, ensuring they are cooked through without burning. Bake the rolls for 20 to 25 minutes, or until they are golden brown on top and sound hollow when tapped on the bottom.
Tips for Checking Doneness
To ensure your rolls are baked perfectly, use a toothpick to check for doneness. Insert it into the center of one of the rolls; if it comes out clean or with just a few crumbs, the rolls are ready. Additionally, keep an eye on their color; the tops should be a lovely golden hue, indicating that the flavors have melded beautifully.
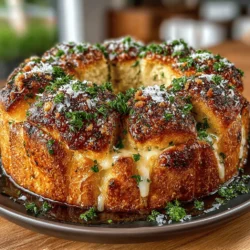
Discussing the Aroma and Appearance
As the rolls bake, your kitchen will be filled with the mouthwatering aroma of garlic and butter. The rolls should puff up and become golden brown, making them not only delicious but visually appealing. Allow them to cool in the pan for a few minutes before transferring them to a wire rack, which helps prevent sogginess.
Serving Suggestions and Pairings
Your Cheesy Garlic Bliss Pull-Apart Rolls are now ready to shine on your dining table. Here are some suggestions to enhance your serving experience.
Ideas for Garnishing the Rolls Post-Baking
Once the rolls have cooled slightly, consider garnishing them with a sprinkle of fresh parsley and additional grated cheese for a beautiful presentation. This not only adds visual appeal but also enhances the flavor, making your rolls even more indulgent.
Suggestions for Complementary Dips
To elevate your dining experience, serve these rolls with complementary dips. A side of marinara sauce adds a tangy contrast that pairs well with the rich garlic butter flavor. Alternatively, a cool ranch dressing can provide a creamy finish that balances the savory rolls.
Ideas for Serving Occasions
These rolls are perfect for various occasions. They make an excellent appetizer for parties, a delightful addition to family gatherings, or a cozy side dish for weeknight dinners. Their versatility means they can fit into any meal or celebration, making them a crowd-pleaser.
Storing and Reheating Leftover Rolls
If you find yourself with leftover rolls (which is unlikely, but still possible), here are some best practices for storage and reheating.
Best Practices for Storing Leftover Rolls
To maintain freshness, store your leftover rolls in an airtight container at room temperature for up to two days. If you want to keep them longer, consider freezing them. Wrap each roll individually in plastic wrap and then place them in a freezer-safe bag. They can last up to three months in the freezer.
Techniques for Reheating Rolls
When it comes to reheating your rolls, the oven is your best option to maintain their original texture. Preheat your oven to 350°F (175°C), place the rolls on a baking sheet, and cover them with aluminum foil to prevent drying out. Heat for about 10-15 minutes or until warmed through.
If you’re short on time, you can use a microwave; however, be cautious as this method can lead to a chewy texture. Heat them in short intervals of 10-15 seconds until just warmed.
Conclusion
In summary, Cheesy Garlic Bliss Pull-Apart Rolls are not just a recipe; they are an experience that brings warmth and joy to any meal. With their fluffy texture, rich garlic flavor, and gooey cheese, these rolls are sure to become a favorite in your household.
Baking them from scratch allows you to enjoy the delightful aroma and satisfaction of homemade bread. So don your apron, gather your ingredients, and embark on this baking adventure. You’ll not only indulge in a delicious treat but also create cherished memories with family and friends around the table. Treat yourself to the bliss of these rolls and watch as they elevate your meals and gatherings!