
Creamy Banana Oat Bliss Bars Recipe
In recent years, there has been a notable shift towards healthier snacking options, driven by an increasing awareness of nutrition and wellness. Busy lifestyles often lead individuals to seek out convenient, yet wholesome, snacks that can be prepared in advance. Enter the Creamy Banana Oat Bliss Bars — a delectable choice that marries nutrition with taste, making it an ideal candidate for meal prep or a quick snack on the go.
These bars are not just a treat for the taste buds; they are a powerhouse of nutrients designed to kick your energy into high gear. With a simple blend of wholesome ingredients, Creamy Banana Oat Bliss Bars cater to various dietary preferences, making them suitable for everyone, from the health-conscious to those with specific dietary restrictions. Whether you’re vegan, gluten-free, or simply looking to incorporate more wholesome snacks into your diet, this recipe offers a versatile solution that doesn’t skimp on flavor.
The Benefits of Banana Oat Bliss Bars
Let’s take a closer look at the nutritional advantages of the key ingredients that make up these bliss bars. The primary components—ripe bananas, Greek yogurt, and oats—each bring their own unique benefits to the table.
Ripe Bananas: The star ingredient of this recipe, ripe bananas are not only naturally sweet but are also rich in potassium, vitamin C, and dietary fiber. Their natural sweetness means you can reduce added sugars, while their soft texture contributes to the creamy consistency of the bars. The fiber content aids digestion, making these bars a filling option that can satisfy hunger without the typical post-snack crash.
Greek Yogurt: Another cornerstone of this recipe, Greek yogurt is known for its high protein content, which is essential for muscle repair and growth. It also contains probiotics that support gut health. The creaminess of Greek yogurt enhances the texture of the bars, providing a rich mouthfeel that complements the bananas perfectly. For those who are lactose intolerant or seeking a dairy-free option, there are plenty of plant-based Greek yogurt alternatives that maintain similar nutritional profiles.
Oats: Rolled oats are an excellent source of whole grains and provide complex carbohydrates that offer sustained energy. They are also rich in beta-glucans, a type of soluble fiber that can help reduce cholesterol levels and promote heart health. Oats are naturally gluten-free, although cross-contamination can occur, so those with celiac disease should look for certified gluten-free oats.
In addition to these primary ingredients, the addition of healthy fats and proteins from nuts and yogurt ensures that these bars are well-rounded, keeping you satisfied and energized throughout the day. The versatility of this recipe also allows for modifications to fit various lifestyles—vegan options can easily be incorporated by substituting Greek yogurt with a plant-based alternative and using maple syrup instead of honey.
Ingredients Breakdown
Before we dive into the preparation, let’s break down the ingredients that you’ll need to create these Creamy Banana Oat Bliss Bars, along with their specific purposes in the recipe.
1. Ripe Bananas: The foundation of the bars, ripe bananas provide natural sweetness and moisture. The browner the bananas, the sweeter and creamier they will be, enhancing the overall flavor and texture of the bars.
2. Greek Yogurt: This ingredient adds a creamy richness and a boost of protein. It also helps bind the bars together, ensuring a moist final product. Opt for plain Greek yogurt to keep added sugars to a minimum, or choose a flavored variety for an extra kick.
3. Rolled Oats: The base of these bars, rolled oats contribute to the chewy texture while providing essential nutrients. They help to absorb moisture and give the bars their structure.
4. Honey or Maple Syrup: Both serve as natural sweeteners, but they bring different flavors and benefits. Honey has a distinct taste and is known for its antibacterial properties, while maple syrup offers a rich, caramel-like flavor and is a vegan-friendly option.
5. Nuts: Walnuts, almonds, or pecans can be included for added crunch and healthy fats. Nuts are an excellent source of protein and fiber, making them a great addition to these bars. For a sweet touch, consider mixing in dark chocolate chips, which will also provide antioxidants.
6. Salt: A pinch of salt is essential to enhance the flavors of the other ingredients. It helps to balance the sweetness of the bananas and honey/maple syrup.
Step-by-Step Instructions for Creamy Banana Oat Bliss Bars
Now that you’re familiar with the benefits and ingredients, let’s dive into the preparation of these delicious bars. Following these step-by-step instructions will ensure that you achieve the perfect Creamy Banana Oat Bliss Bars.
Step 1: Prepare the Baking Dish
Before you begin mixing the ingredients, preheat your oven to 350°F (175°C). Line an 8×8-inch baking dish with parchment paper, allowing some overhang on the sides. This will make it easier to lift the bars out of the pan once they are baked, ensuring that your delicious creation is easy to serve and store.
Step 2: Mix the Liquid Ingredients
In a large mixing bowl, mash the ripe bananas with a fork until smooth. You want to ensure that there are no large chunks left, as this helps to create a uniform texture. Next, add the Greek yogurt and the chosen sweetener (honey or maple syrup) to the mashed bananas. Mix well until you achieve a creamy consistency. For an extra touch, you can blend the ingredients together using an immersion blender, which will create an even smoother mixture.
Step 3: Combine Dry Ingredients
In a separate bowl, combine the rolled oats and a pinch of salt. If you’re using any nuts or chocolate chips, you can add them to this mixture as well. Stir the dry ingredients together to ensure that the oats, nuts, and chips are evenly distributed. This step is crucial; it prevents clumping and ensures every bite of your bars is filled with delicious flavor.
With these initial steps complete, you’re well on your way to creating a batch of Creamy Banana Oat Bliss Bars that not only taste amazing but also provide a nutritious snack option. As you continue with the remaining steps, you’ll find that the process is both simple and rewarding, making these bars a favorite in your healthy recipe repertoire.
{{image_2}}
Incorporating Mixtures
Once your banana oat mixture is ready, it’s crucial to incorporate the ingredients gently. This step ensures that the batter retains its light and airy texture, which is key for the final bar’s consistency. Start by taking your dry ingredients—oats, flour, baking powder, and any spices—and sift them together in a separate bowl. This will help eliminate lumps and ensure even distribution.
Next, add your wet ingredients—mashed bananas, nut butter, and your choice of sweetener—to the dry mixture. Use a rubber spatula or wooden spoon to fold the ingredients together. The folding technique is essential: start from the bottom of the bowl and lift the mixture over itself repeatedly. Avoid stirring vigorously, as this can deflate the mixture and lead to dense bars. Instead, gently combine until no dry flour remains visible, and the mixture is evenly blended.
Adding Nuts and Chocolate
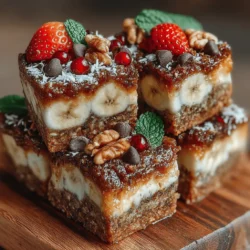
Enhancing your Creamy Banana Oat Bliss Bars with nuts and chocolate not only adds flavor but also introduces a delightful crunch that contrasts beautifully with the creamy texture. You can opt for a variety of nuts—walnuts, almonds, or pecans all work wonderfully. Simply chop them coarsely before folding them into the mixture.
If you’re a chocolate lover, consider adding dark chocolate chips or chunks. These will melt slightly during baking, creating pockets of gooey chocolate throughout the bars. Aim for a balance; too many mix-ins can overwhelm the flavors of the base. A half cup of nuts and a half cup of chocolate should provide a delightful texture without overpowering the banana and oat flavors.
Transferring the Mixture
Once the mixture is well-combined, it’s time to transfer it to your prepared baking dish. For optimal bar structure, use a spatula to spread the mixture evenly across the bottom of the dish. Start by scooping the mixture into the center and then gently pushing it towards the corners. To ensure a compact mixture, use the bottom of a measuring cup or your hands (lightly dampened) to press down firmly. This step is crucial, as it helps the bars hold their shape and achieve a chewy texture when baked.
Freezing the Mixture
Freezing the mixture before baking is an optional yet beneficial step that can enhance the texture of your bars. After you’ve pressed the mixture into the baking dish, cover it with plastic wrap and place it in the freezer for about 30 minutes. This allows the fats from the nut butter to solidify slightly, which can lead to a more cohesive bar after baking. Additionally, chilling the mixture helps the flavors meld together, resulting in a tastier final product.
Cutting into Bars
Once your bars have baked to golden perfection, let them cool completely in the pan before cutting. This cooling period is essential as it allows the bars to set, making them easier to cut. For clean edges and uniform sizes, use a sharp knife or a pizza cutter. Start by cutting the bars into the desired size—typically, 2-inch squares or rectangles work well. For best results, wipe the knife with a damp cloth after every few cuts to prevent sticking.
Serving Suggestions
Creamy Banana Oat Bliss Bars are incredibly versatile and can be enjoyed in various ways. They make a perfect grab-and-go snack for busy mornings or a satisfying post-workout treat. Serve them with a dollop of Greek yogurt and a sprinkle of fresh fruit for a nutritious breakfast option. Alternatively, pack them in lunchboxes as a delightful midday boost for kids and adults alike.
For a more indulgent treat, consider drizzling melted dark chocolate over the top or serving them alongside a scoop of vanilla ice cream. They can also be enjoyed crumbled over a smoothie bowl or yogurt parfait, adding a delicious crunch.
Flavor Variations and Customizations
The beauty of Creamy Banana Oat Bliss Bars lies in their adaptability, allowing you to experiment with different flavors. Here are some exciting variations to consider:
– Spices: Enhance the flavor profile by adding spices like nutmeg, cardamom, or cinnamon. A teaspoon of each can elevate the taste and give your bars a warm, aromatic essence.
– Fruits: While bananas are the star of this recipe, you can also experiment with other fruits. Try adding chopped apples, pears, or even dried fruits like cranberries or apricots for a different texture and taste.
– Nut Substitutions: If you have nut allergies or prefer to avoid them, consider using seeds like sunflower or pumpkin seeds. These alternatives still provide a great crunch and nutrition without the allergens.
– Superfoods: For a nutritional boost, incorporate superfoods such as chia seeds or flaxseeds. These tiny powerhouses are rich in omega-3 fatty acids and fiber. Simply add a couple of tablespoons to the mixture before baking.
Storage and Shelf Life
To ensure your Creamy Banana Oat Bliss Bars stay fresh, proper storage is key. After they have cooled completely, store them in an airtight container at room temperature for up to a week. If you want to keep them longer, consider freezing them. Wrap each bar individually in plastic wrap and then place them in a freezer-safe bag. They can last for up to three months in the freezer.
When you’re ready to enjoy a bar, simply remove it from the freezer and let it thaw at room temperature for about 30 minutes. Alternatively, you can microwave it for about 15-20 seconds for a quick warm-up.
If you find yourself with leftover bars, get creative! Crumble them into a smoothie for added texture and flavor, or use them as a topping for yogurt bowls. The possibilities are endless!
Conclusion
Creamy Banana Oat Bliss Bars are not only a delicious and satisfying snack but also an incredibly versatile one. Packed with wholesome ingredients, these bars offer a great way to enjoy healthy eating without sacrificing flavor. Whether you stick to the classic recipe or experiment with various mix-ins and flavors, these bars will quickly become a staple in your kitchen.
So, gather your ingredients, whip up a batch, and see how easy it is to create a nutritious snack that everyone will love. Embrace the joy of homemade treats and the satisfaction that comes from making health-conscious choices. Enjoy your journey into the world of delicious, wholesome snacking!