
Garlic Butter Chicken Pasta Jars: A Delectable Meal Prep Option
In the fast-paced world we live in, finding a delicious yet straightforward meal prep option can be a game-changer. Enter the Garlic Butter Chicken Pasta Jars, a delightful dish that not only satisfies your taste buds but also makes for an appealing meal presentation. This recipe combines the rich flavors of garlic and butter with tender chicken and pasta, all beautifully layered in a jar. It’s perfect for those who want to enjoy a hearty meal without spending hours in the kitchen or sacrificing presentation.
One of the primary appeals of this recipe lies in its convenience. Preparation is swift, making it an ideal choice for busy individuals or families. The vibrant colors of the ingredients, when served in jars, create a visually pleasing meal that is sure to impress. Moreover, the versatility of the ingredients allows you to cater to various dietary preferences, whether you’re gluten-free, vegetarian, or simply looking to switch things up.
The Allure of Pasta Jars
In recent years, the trend of using jars for meal prep has gained significant traction. The convenience they offer is unparalleled; jars are not only portable but also perfect for portion control. Whether you’re heading to the office, a picnic, or simply want an easy lunch at home, these jars make it easy to grab-and-go. They help keep your meals organized and make it simple to store leftovers, reducing food waste and encouraging you to eat healthily.
Preparing meals in advance has numerous benefits. For one, it saves time during busy weekdays. With everything prepped and ready to go, you can easily grab your meal jar and be on your way. Additionally, meal prepping can help you make healthier choices, as you’re less likely to reach for unhealthy snacks when you have a nutritious meal ready at your fingertips. Plus, the act of preparing meals ahead of time can be a fun and creative process, allowing you to experiment with flavors and textures.
Ingredients Breakdown
Pasta Selection
When it comes to the base of your Garlic Butter Chicken Pasta Jars, the choice of pasta is crucial. Rotini pasta is a fantastic option due to its spiral shape, which holds onto sauces beautifully. The texture of rotini provides a satisfying bite, making it a favorite among pasta lovers. However, if you’re looking for alternatives, there are plenty of options available. Gluten-free pasta varieties made from rice, quinoa, or lentils are excellent choices for those with dietary restrictions, while whole grain pasta can add a nutty flavor and extra fiber.
Protein Choice
For the protein component, boneless, skinless chicken thighs stand out as the ideal choice. They are juicy and tender, and their rich flavor enhances the overall dish significantly. Chicken thighs also have a relatively short cooking time, making them perfect for quick meal prep. If you prefer to switch things up, there are several alternatives you can consider. Shrimp can be a light and flavorful option, while tofu is perfect for a vegetarian twist. Ground turkey is another excellent choice that cooks quickly and adds a mild flavor profile.
Flavor Enhancers
The heart of this dish lies in its flavor enhancers: garlic and butter. These two ingredients work together to create a rich, savory experience that elevates the pasta and chicken to new heights. The aromatic qualities of garlic, combined with the creamy richness of butter, form a luscious sauce that coats every bite. To add a hint of heat and complexity, red pepper flakes can be included, while Italian herbs such as oregano and basil provide depth and balance to the dish.
Fresh Ingredients
Incorporating fresh ingredients like cherry tomatoes and spinach not only boosts the nutritional value of your meal but also adds vibrant colors that make your jars visually appealing. Cherry tomatoes burst with sweetness, enhancing the overall flavor, while spinach contributes a wealth of vitamins and minerals. For that final touch of creaminess and umami richness, grated Parmesan cheese is a must. It melts beautifully when combined with the warm pasta and chicken, creating a delightful contrast to the fresh ingredients.
Step-by-Step Instructions
Cooking the Pasta
To kick off your Garlic Butter Chicken Pasta Jars, the first step is cooking your pasta. Begin by bringing a large pot of salted water to a rolling boil. The salt is essential as it adds flavor to the pasta as it cooks. Once the water is boiling, add the rotini pasta and cook according to the package instructions, usually around 8-10 minutes, until it is al dente. Remember, the pasta will continue to cook slightly when mixed with the hot chicken and sauce later, so it’s essential not to overcook it.
While the pasta is cooking, prepare your chicken. In a separate skillet, melt a generous amount of butter over medium heat. Add minced garlic and sauté until fragrant—this typically takes about a minute. Then, add the chicken thighs, seasoned with salt, pepper, and red pepper flakes. Cook the chicken until it is browned and cooked through, ensuring it reaches an internal temperature of 165°F. Once the chicken is cooked, remove it from the skillet and let it rest for a few minutes before slicing it into bite-sized pieces.
Next, if you want to include fresh cherry tomatoes and spinach, add them to the same skillet with a splash of olive oil. Sauté them just until the spinach wilts and the tomatoes begin to soften, which usually takes about 2-3 minutes. This step not only enhances the flavors but also ensures that the vegetables retain their vibrant color and nutrients.
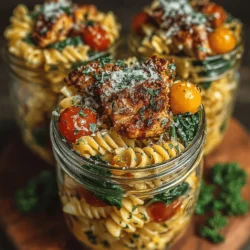
With all the components cooked, it’s time to assemble your Garlic Butter Chicken Pasta Jars. Start by layering the pasta at the bottom of the jar, followed by the sliced chicken, sautéed vegetables, and a generous sprinkle of Parmesan cheese. This layering not only looks appealing but also helps to keep the ingredients fresh and flavorful until you’re ready to enjoy your meal.
As you prepare to continue with the assembly of your jars, each layer of ingredients will contribute to a harmonious blend of flavors, making every bite as delightful as the last. Stay tuned for the next steps, where we’ll take a closer look at finishing touches and storage tips for your Garlic Butter Chicken Pasta Jars.
{{image_2}}
Importance of Al Dente Texture for Pasta in a Jar
Achieving the perfect al dente texture is crucial when preparing pasta for your Garlic Butter Chicken Pasta Jars. Al dente, which translates to “to the tooth” in Italian, refers to pasta that is cooked just right: tender yet firm to the bite. This texture is not only essential for taste but also plays a significant role in how the pasta interacts with the other ingredients in the jar. Overcooked pasta can become mushy and lose its ability to hold up against the rich garlic butter sauce, while undercooked pasta can be unpleasantly chewy.
Tips on Salting Water and Timing for Perfect Pasta Consistency
To ensure your pasta reaches that perfect al dente state, follow these simple tips:
1. Salt Your Water Generously: Use about 1-2 tablespoons of salt per gallon of water. This is your only chance to season the pasta itself, and it enhances the overall flavor of the dish.
2. Timing is Key: Cook your pasta according to the package instructions but start checking for doneness about 2 minutes before the suggested cooking time. The pasta should be firm yet cooked through.
3. Reserve Some Pasta Water: Before draining, save a cup of the starchy pasta water. This can be a game-changer when combining with your sauce, helping to thicken it and bind the flavors together.
Sautéing the Chicken
Sautéing the chicken is a critical step in building the flavor profile of your Garlic Butter Chicken Pasta Jars. The goal is to achieve that beautifully golden-brown exterior while ensuring the chicken remains juicy and tender on the inside.
Detailed Explanation of the Sautéing Process: Achieving Golden-Brown Chicken
1. Preheat Your Pan: Begin by preheating a large skillet over medium-high heat. This initial heat is essential for searing the chicken properly.
2. Add Oil: Once the skillet is hot, add a tablespoon of olive oil or butter. Allow it to heat up until shimmering.
3. Sauté the Chicken: Add the chicken pieces in a single layer, making sure not to overcrowd the pan. This allows for proper browning. Let the chicken cook for about 5-7 minutes without moving it, so it can develop a nice crust.
4. Flip and Season: Once one side is golden, flip the chicken and season the other side with salt, pepper, and any additional herbs you prefer, such as Italian seasoning or paprika. Cook for another 4-5 minutes until the chicken is fully cooked through.
5. Check for Doneness: Use a meat thermometer to ensure the internal temperature reaches 165°F. This will guarantee that your chicken is safe to eat and perfectly cooked.
Discussion on Seasoning and Its Impact on Flavor
The seasoning of your chicken is crucial; it’s the first layer of flavor in your dish. Don’t skimp on the salt and pepper, as they enhance the meat’s natural flavor. Consider adding garlic powder, onion powder, or fresh herbs for additional depth. The right seasoning will make every bite of your Garlic Butter Chicken Pasta Jars an explosion of taste.
Creating the Garlic Butter Sauce
The garlic butter sauce is the heart of this dish, offering a rich and comforting flavor that elevates the chicken and pasta.
Importance of Temperature Control When Sautéing Garlic to Avoid Bitterness
Garlic is delicate and can quickly turn from fragrant to burnt. To avoid bitterness, follow these guidelines:
1. Lower the Heat: After sautéing the chicken, reduce the heat to medium. This will help prevent the garlic from burning.
2. Add Garlic Slowly: Add minced garlic to the pan and stir continuously. Garlic only needs about 30 seconds to a minute to become fragrant. Keep a close eye on it, as it can go from perfect to burnt in seconds.
Techniques for Achieving the Perfect Garlic Butter Blend
1. Incorporate Butter: After the garlic has sautéed, add 3-4 tablespoons of unsalted butter to the pan. Stir until the butter has melted and combines with the garlic, creating a luscious sauce.
2. Add Pasta Water: For a silky texture, gradually add a few tablespoons of the reserved pasta water, stirring to combine. This will help bind the sauce to the pasta.
3. Finish with Fresh Herbs: To finish the sauce, add fresh herbs like parsley or basil. This adds brightness and freshness to the rich garlic butter sauce.
Combining All Ingredients
Properly combining your ingredients ensures that every jar is bursting with flavor and freshness.
Importance of Timing and Order When Adding Ingredients
When combining your ingredients, the order matters. Start by adding the cooked pasta to the skillet with the garlic butter sauce, followed by the sautéed chicken. This allows the pasta to soak up the flavors of the sauce and ensures even distribution of the chicken.
1. Add Spinach and Tomatoes Last: Once the pasta and chicken are well mixed, fold in the fresh spinach and halved cherry tomatoes. These ingredients cook quickly and should remain vibrant and fresh.
Visual Cues to Look for When Checking Doneness of Spinach and Tomatoes
– Spinach: It should wilt down significantly but still retain a bright green color. This usually takes about 1-2 minutes.
– Tomatoes: They should be warmed through and slightly softened but not mushy. This usually takes about 2-3 minutes.
Assembling the Jars
Once everything is combined and cooked to perfection, it’s time to assemble your Garlic Butter Chicken Pasta Jars for a beautiful presentation.
Tips for Layering Ingredients for Optimal Presentation and Taste
1. Start with Pasta: Begin by adding a layer of the garlic butter pasta at the bottom of each jar. This creates a solid base and prevents the sauce from seeping out.
2. Add Chicken: Layer the sautéed chicken on top of the pasta, ensuring even distribution.
3. Finish with Veggies: Top with wilted spinach and tomatoes. This not only adds color but also enhances the nutritional value of the jars.
Suggestions for Garnishing and Personalizing Jars for Visual Appeal
Consider garnishing with freshly grated Parmesan cheese, a sprinkle of black pepper, or additional fresh herbs. You can also add a wedge of lemon for a zesty touch or a drizzle of balsamic glaze for extra flavor.
Storage and Serving Suggestions
Best Practices for Storing the Assembled Jars in the Refrigerator
Store your assembled Garlic Butter Chicken Pasta Jars in the refrigerator for up to 4 days. Ensure the jars are airtight to maintain freshness and prevent any odors from permeating the dish.
Guidelines for Reheating: Ensuring Even Heating and Maintaining Texture
When ready to enjoy your dish, reheat in the microwave or on the stovetop. If using the microwave, heat in 30-second intervals, stirring in between to ensure even heating. If warming on the stove, add a splash of water or extra butter to prevent sticking and enhance the sauce’s creaminess.
Potential Pairings with the Garlic Butter Chicken Pasta Jars: Salads, Bread, or Wine Recommendations
For a complete meal, consider serving your Garlic Butter Chicken Pasta Jars with a light salad, such as a mixed greens salad with vinaigrette. Crusty garlic bread is also a fantastic accompaniment for soaking up any leftover sauce. If you enjoy wine, a crisp white wine like Sauvignon Blanc pairs beautifully with this dish.
Nutritional Information
Overview of the Nutritional Benefits of the Ingredients Used in the Recipe
Each serving of Garlic Butter Chicken Pasta Jars is not only delicious but also packed with nutritional benefits:
– Chicken: A great source of lean protein, essential for muscle repair and growth.
– Pasta: Provides carbohydrates for energy and can be made with whole grains for added fiber.
– Spinach: Rich in iron, calcium, and vitamins A and C, it contributes to overall health and well-being.
– Garlic: Known for its numerous health benefits, including anti-inflammatory properties and immune support.
Discussion on Calorie Content, Protein, and Vitamin Contributions Per Serving
On average, one serving of Garlic Butter Chicken Pasta Jars contains approximately 450-500 calories, with around 30 grams of protein, making it a satisfying and balanced meal option. The vitamins and minerals from the vegetables enhance its nutritional profile, making it a smart choice for any home cook.
Conclusion
Preparing Garlic Butter Chicken Pasta Jars is not only easy but also incredibly satisfying. This recipe stands out for its adaptability, allowing you to customize ingredients based on dietary preferences or what’s available in your pantry. Whether you are feeding a family or preparing meals for the week ahead, these jars are a fantastic option that combines convenience with gourmet flavors.
Encourage yourself to try this recipe and savor the delightful results of your efforts. Cooking at home can be a joyful experience, and with the Garlic Butter Chicken Pasta Jars, you’ll create a dish that’s as pleasing to the eye as it is to the palate. Enjoy the simplicity and warmth of home-cooked meals, and share this delightful recipe with friends and family for them to enjoy as well.