
Grilled Cherry Popsicles Recipe: A Refreshing Summer Treat
As summer rolls in, the allure of homemade popsicles becomes irresistible. There’s something about the hot sun that calls for cool, refreshing treats. While traditional popsicles made from juice and pureed fruits are a staple, there’s a unique twist to consider: grilling. Grilled cherry popsicles not only offer a delightful burst of flavor but also an engaging way to enjoy one of summer’s sweetest fruits.
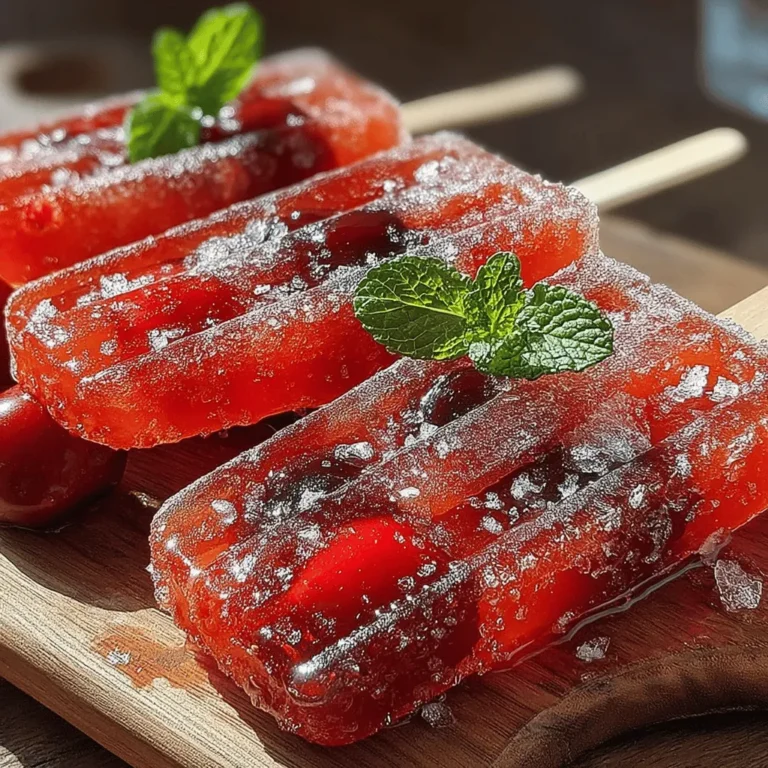
Imagine the rich, smoky notes of grilled cherries combined with the natural sweetness of the fruit, all frozen into a refreshing treat. This recipe elevates the classic popsicle experience by incorporating fresh, seasonal ingredients that are both delicious and health-conscious. Homemade popsicles allow you to control the sweetness and flavor profile, making them a healthier alternative to store-bought options, which are often packed with preservatives and artificial flavors.
The Allure of Grilled Popsicles
What sets grilled popsicles apart from their ungrilled counterparts? The answer lies in the grilling process itself. When cherries are grilled, their natural sugars caramelize, creating a depth of flavor that is both complex and satisfying. The heat transforms the fruit, enhancing its innate sweetness while introducing a smoky element that can’t be replicated by simply blending fresh fruit.
Using fresh fruits in popsicle recipes not only contributes to superior taste but also offers a host of nutritional benefits. Cherries, for example, are packed with vitamins, antioxidants, and anti-inflammatory properties. They are low in calories and high in fiber, making them an ideal choice for a refreshing summer snack. Grilled popsicles also differ from traditional frozen treats in texture; the grilling process adds a slight char that gives the popsicles a unique mouthfeel, setting them apart from the typical icy texture of standard popsicles.
Ingredients Breakdown
Before diving into the preparation of grilled cherry popsicles, let’s take a closer look at the ingredients that make this recipe so special.
– Fresh Cherries: The star of the show is undoubtedly the fresh cherries. Not only are they bursting with flavor, but they are also a powerhouse of nutrients. Rich in vitamin C, potassium, and antioxidants, cherries can help reduce inflammation and improve sleep quality. Their juicy sweetness is ideal for creating a popsicle that is both tasty and nutritious.
– Cherry Juice: Although fresh cherries are used as the primary ingredient, cherry juice can serve as a complementary component or an alternative for those who may wish to enhance the cherry flavor. When selecting cherry juice, opt for varieties that are 100% juice without added sugars for a healthier option.
– Sweeteners: The sweetness of the popsicle can be adjusted with natural sweeteners like honey or maple syrup. Honey adds a floral note that pairs beautifully with cherries, while maple syrup contributes a rich, earthy flavor. Both options are healthier than refined sugars, making them perfect for a guilt-free summer treat.
– Lemon Juice: A splash of fresh lemon juice is crucial in balancing the sweetness of the cherries and sweeteners. The acidity from the lemon not only brightens the overall flavor but also enhances the natural tartness of the cherries, creating a well-rounded taste that isn’t overly sweet.
– Vanilla Extract: A dash of vanilla extract adds depth and complexity to the flavor profile. This ingredient enhances the overall taste of the popsicles, making them more sophisticated and enjoyable.
– Sea Salt: It may seem counterintuitive, but adding a pinch of sea salt can amplify the flavors of the other ingredients. Salt enhances sweetness and offsets any bitterness, resulting in a more balanced and flavorful treat.
– Optional Mint Garnish: For those looking to elevate their grilled cherry popsicles, a mint garnish adds a refreshing touch. Not only does mint introduce a cool flavor that complements the cherries, but it also adds a pop of color, making the popsicles visually appealing.
Step-by-Step Instructions
Now that we’ve explored the delicious ingredients that go into grilled cherry popsicles, it’s time to begin the preparation. The first step involves marinating the cherries, an essential process that enhances their flavor before grilling.
1. Marinating the Cherries: Start by washing and pitting the fresh cherries. Once they are prepared, place them in a mixing bowl. The marinade will consist of your choice of sweetener (honey or maple syrup), a splash of lemon juice, and a drop of vanilla extract.
2. Importance of Marinating for Flavor Enhancement: Allow the cherries to marinate for at least 30 minutes. This step is crucial as it allows the cherries to absorb the flavors of the marinade, resulting in a more flavorful and juicy final product. During this time, the sugars from the sweeteners will begin to penetrate the fruit, enhancing its natural sweetness and preparing it for grilling.
3. Visual Cues for Knowing When Cherries Are Ready: After marinating, you’ll notice that the cherries have released some of their juices and have taken on a more vibrant color. This is a sign that they are ready to be grilled. The combination of the marinade and the natural sugars in the cherries creates an optimal environment for grilling, leading to caramelization and a deliciously smoky flavor.
With the cherries marinated and ready, you can move on to the grilling process, where the magic truly happens. The next step will involve grilling the cherries to perfection, which will bring out their rich, complex flavors and set the foundation for your refreshing popsicles.
Stay tuned for the continuation of this recipe, where we will explore the grilling process and how to transform these delectable cherries into the perfect summer treat!
{{image_2}}
Creating the Cherry Mixture
To start crafting your delightful grilled cherry popsicles, the first step is to prepare a rich cherry mixture. Begin with fresh, ripe cherries, as they are the star of this recipe. You will need approximately 2 cups of pitted cherries. If fresh cherries are out of season, frozen cherries can be a great alternative. Ensure they are thawed and well-drained before use.
1. Blend the Cherries: In a blender, combine the pitted cherries with 1-2 tablespoons of honey or maple syrup, depending on your sweetness preference. For a balanced flavor, consider adding a splash of vanilla extract—about 1 teaspoon should do. Blend until the mixture is smooth. If you prefer a chunkier texture, pulse the blender a few times to retain some cherry pieces.
2. Strain the Mixture (Optional): If you desire a smoother popsicle without any bits of fruit, pour the blended mixture through a fine mesh strainer into a bowl. Use a spatula to push the mixture through, leaving behind the skins and pulp.
Tips for Achieving the Right Texture in the Blend
Achieving the ideal texture in your cherry mixture is crucial for the final popsicle experience. Here are some tips:
– Right Consistency: The mixture should be smooth but not overly watery. If the mixture is too thin, add a bit more fruit or a banana for creaminess. Conversely, if it’s too thick, add a little water or coconut water until you reach the desired consistency.
– Taste as You Go: Always taste the mixture before pouring it into molds. This allows you to adjust the sweetness or add more cherries for a richer flavor.
Suggestions for Alternative Flavor Additions
While cherries provide a fantastic base, feel free to experiment with different flavors. Here are some suggestions for alternative additions:
– Spices: Incorporate a pinch of cinnamon or nutmeg to add warmth and complexity to your popsicles. A dash of cayenne pepper can introduce a surprising kick.
– Other Fruits: Blend in other fruits with cherries for a unique flavor combination. Peaches, strawberries, and raspberries pair beautifully with cherries. You can also create a berry medley by mixing blueberries and blackberries with your cherry base.
Pouring into Molds
Once your cherry mixture is ready, it’s time to fill the molds. Here are some best practices for a successful pour:
1. Choose the Right Molds: Silicone molds are ideal as they easily release the popsicles once frozen. If using plastic molds, ensure they are of good quality and easy to clean.
2. Filling Without Spilling: Use a funnel to pour the mixture into the molds. This minimizes mess and ensures you can fill each mold evenly. Fill the molds about ¾ full, leaving some space for the mixture to expand as it freezes.
3. Avoiding Ice Crystals: To prevent large ice crystals from forming, avoid adding too much water. The right balance of sugar and fruit will help maintain a smooth texture. Additionally, consider using full-fat coconut milk or yogurt to create a creamier popsicle.
Preparing the Grill
Before grilling, it’s essential to prepare your grill correctly for the best results. Here’s how:
1. Preheating the Grill: Preheat your grill to medium heat (around 350-400°F). This temperature is crucial for achieving those beautiful grill marks and caramelization on your popsicles.
2. Know When the Grill is Ready: You can tell your grill is ready by holding your hand about 6 inches above the grill grates. If you can only hold it there for 2-3 seconds before it feels too hot, you’re at the right temperature.
Grilling the Popsicles
Grilling your popsicles adds a delicious smoky flavor that is unlike any regular frozen treat. Here’s how to grill them without melting:
1. Techniques for Grilling: Use skewers to hold the popsicles while grilling. This will allow you to manipulate them easily without losing the popsicle shape. If you prefer not to use skewers, be careful to place the popsicles directly on the grill grates, ensuring they’re not touching each other.
2. Ideal Grilling Times: Grill the popsicles for about 2-3 minutes on each side. Keep an eye on them; you want to achieve light grill marks without melting them completely. Use tongs to turn them gently.
Serving Recommendations
Presentation is key when serving grilled cherry popsicles. Here are some creative plating ideas and pairing suggestions:
1. Creative Plating Ideas: Serve the popsicles on a colorful platter, garnished with fresh mint leaves and a sprinkle of sea salt for an appealing contrast. Drizzle with a little extra cherry sauce or a berry coulis to add a pop of color and flavor.
2. Pairing Suggestions: These popsicles pair wonderfully with other summer desserts. Consider serving them alongside a scoop of vanilla ice cream or a dollop of whipped cream for a refreshing contrast. They also complement a light summer fruit salad or a slice of tart lemon cake.
Nutritional Information
Understanding the nutritional benefits of cherries can enhance your appreciation for this refreshing treat.
– Health Benefits of Cherries: Cherries are packed with antioxidants, vitamins, and minerals. They are known for their anti-inflammatory properties and can aid in recovery after exercise. Additionally, cherries are a source of melatonin, which can help improve sleep quality.
– Caloric Breakdown per Serving: Each popsicle contains approximately 50-70 calories, depending on the amount of sweetener used and whether you’ve added any additional ingredients like coconut milk. This makes them a guilt-free treat on a hot day.
– Balanced Diet Fit: Grilled cherry popsicles can fit perfectly into a balanced diet. They provide a healthy dose of fruit without excessive sugars, making them an excellent option for dessert or a midday snack.
Conclusion
Making grilled cherry popsicles is a delightful experience that combines the sweetness of cherries with the smoky essence of grilling. With simple ingredients and a few easy steps, you can create a refreshing summer treat that is sure to impress family and friends. Don’t hesitate to experiment with different fruit combinations and grilling techniques to find your perfect popsicle.
As the warm weather beckons, indulge in the joy of homemade treats that celebrate the season’s bounty. Enjoy the fun of creating these delicious popsicles and savor every bite as you relish the summer sun. Whether you’re hosting a backyard barbecue or simply enjoying a quiet afternoon, grilled cherry popsicles are a perfect way to cool down and delight your taste buds.
